Samba is a collection of programs that form a file server for Linux. It's dead-easy to setup and get going with, and is very fast. I use it for a variety of things, but its killer application for me was accessing my music collection. I recently moved from NFS to Samba to share around 500 gigs of tunes, and what was a mediocre solution turned into something that I can't tell isn't on my local disk. It's great.
This simple guide will focus on how easy it is to get up and going quickly - with more advanced configuration features to come.
As usual, for just a wee bit of background, let's consult the man page:
"The Samba software suite is a collection of programs that implements the Server Message Block (commonly abbreviated as SMB) protocol for UNIX systems and provides Active Directory services. The first version of the SMB protocol is sometimes also referred to as the Common Internet File System (CIFS)."
Okay. Let's setup a Samba share!
Getting Started
First, update your packages and then install Samba. As usual, the package management instructions are for Debian-stream Linux:
$ sudo apt update && sudo apt upgrade
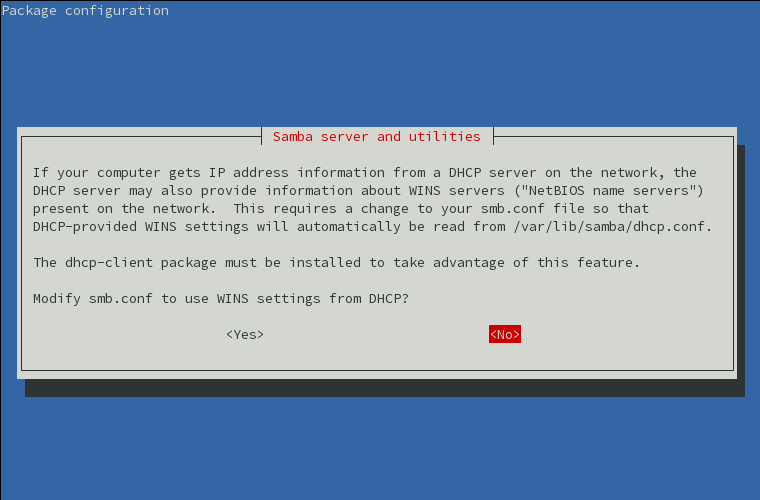
$ sudo apt install sambaIf prompted to modify the configuration file to use WINS settings, select 'No':
We also need to create a folder to share on the network. Let's create one at /srv/my_share, and add a couple files to make testing our share more obvious:
$ sudo mkdir /srv/my_share
$ cd /srv/my_share
$ touch file1 file2 file3
Now let's make us the owner of this folder. In the following command, substitute your username:
$ sudo chown -R <username>:<username> /srv/my_shareOkay! Now we can configure Samba to share that folder.
Configuring Samba:
Share settings are stored in /etc/smb.conf. Add the following to the bottom of the file:
[My Share]
        comment = My Samba Share
        path = /srv/my_share
        read only = no
        guest ok = yes
        create mask = 0644
        directory mask = 0755
        writable = yes
        browseable = yes
The options used are as follows:
[Name]- Declares a new share by namecomment- Describes the share in human readable format, and is displayed by some network browserspath- The location of the folder to shareguest ok- Permit unauthenticated, 'guest' access to the sharecreate mask- The permission mask to apply to any files created in the share (i.e. by the user samba runs as)- 644 for instance, would turn off execute for owner, and limit both group and everyone else to read
directory mask- Same as create mask, but for directory creation- 755 allows owner to read, write and execute directories, and group and everyone to read and execute them
writable- Set the directory as 'writable' (allows a read-only file in the directory to be deleted)browseable- Makes the share appear in various network browsers, like in Window Explorer's network view.
Having declared our share, let's now restart the Samba service:
$ sudo systemctl restart smbd.serviceOkay, the share is all set up!
Connecting to our Samba Share:
Windows, OS X, and most Linux boxes with any kind of fancy desktop environment like Nautilus in Mint should be able to see the share in their network browsers.
To connect to the share from the command line on Linux, we'll need to do just a bit more work.
One of the things you get with a fancier desktop environment are lots of 'helpful' packages installed out of the box. In this case, it's file system tools. To connect to a Samba share from Debian, we'll need the cifs-utils package so that our machine can communicate with the server:
$ sudo apt install cifs-utilsWith that installed, we can now access our share by IP (or host name if you've set them up):
$ sudo mkdir /mnt/tmp
$ sudo mount -t cifs //ip.addr.of.server//My\ Share /mnt/tmp
When it prompts you for your password, enter the password of the owner of directory you used when we ran chown earlier.
And Voila! You've setup, logged into, and can now access a share on Linux, from Linux!
There are a myriad more steps to take to make the setup more robust, secure, and usable, but this is enough to get you flying immediately.