
Welcome to part three in our ongoing tutorial series on how to setup a nice Linux environment! Today we'll cover the oh-so-popular shell customization portion. We'll install the "delightful community-driven framework for managing your zsh configuration" Oh My Zsh (which can be found here) to customize our Terminator terminal experience. Oh My Zsh (OMZ) comes bundled with a load of cool themes, but there are even more available externally. This tutorial will cover setting it up with a bundled theme, before installing the Powerlevel9k theme that I use, and its various prerequisites.
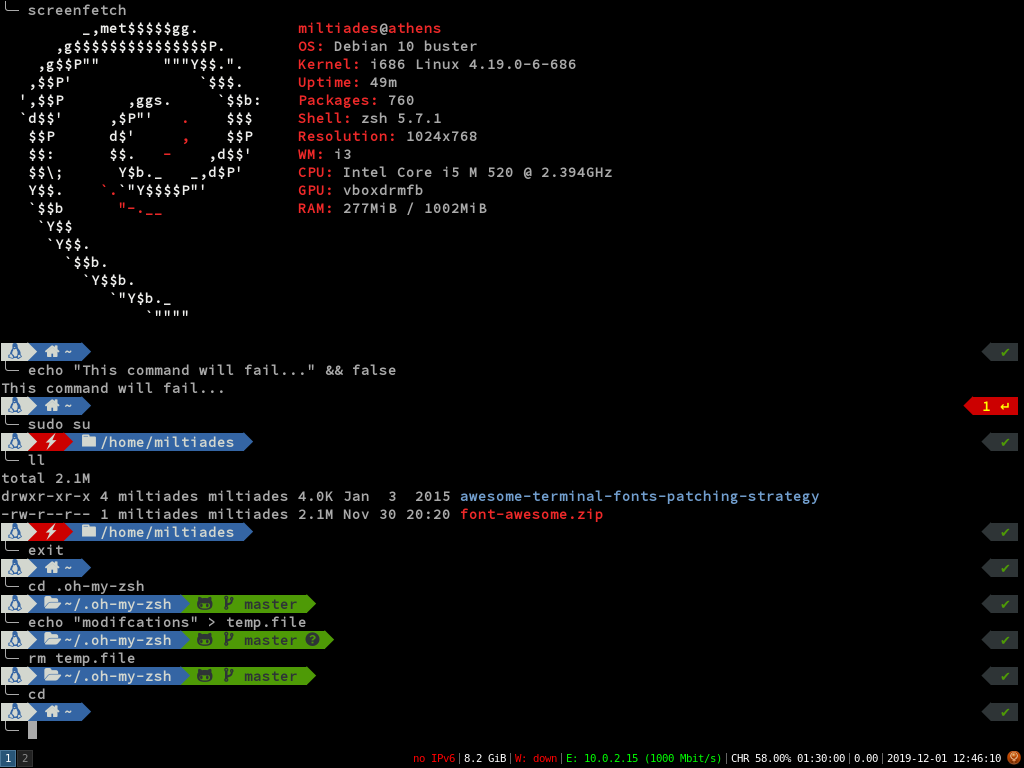
At the end of the article, we'll have something that looks like this:
Installing Oh My Zsh:
Without further ado, let's get customizing. As always, we'll begin by updating our installed software. Then we'll install OMZ's requirements (git, curl and zsh) and then install OMZ. git is the ubiquitious version control software, and curl is a simple yet powerful command line network tool (though it's perhaps most often used for downloading things). If you've been following this tutorial series you've already got zsh installed, but as we'll see it can't hurt to add it to the install list:
sudo apt update && sudo apt upgrade -y
sudo apt install git curl zsh
Now, per the OMZ instructions, we'll download the install script and install it. I find it highly endearing that the authors remind would-be users to inspect code before they run it. In the case of their install script, it looks okay (at least at the time of writing ;)).
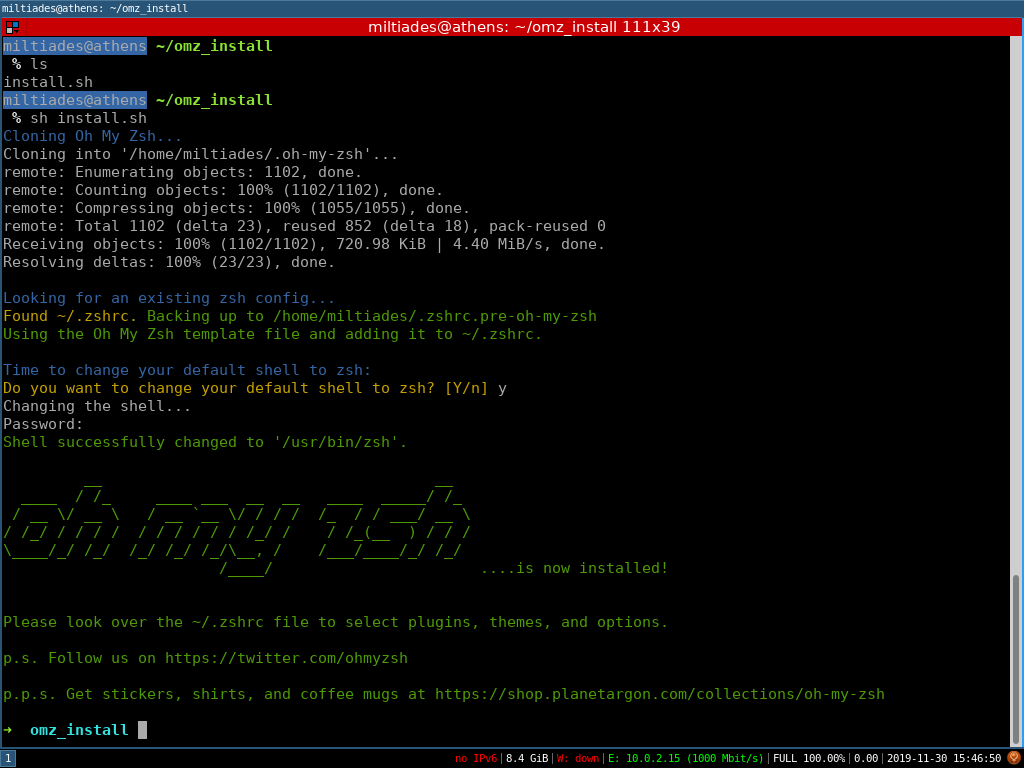
curl -Lo install.sh https://raw.githubusercontent.com/ohmyzsh/ohmyzsh/master/tools/install.sh
sh install.sh
Ok! Press y and enter your password to change your default shell to zsh. Here we are in a directory called "omz_install":
Time to setup a theme. By default, the robbyrussel theme is set. Let's try the suggested fancier theme agnoster by editing the 'ZSH_THEME' line in ~/.zshrc (~/ refers to your home folder - so my config is at /home/miltiades/.zshrc). One incredibly nice feature that you can play with out of the box is that autocomplete suggestions can be tabbed through, or even navigated with the arrow keys! Try autocompleting the rest of the following by hitting tab:
vi ~/.zshChoose .zshrc by pressing enter once you've selected it, and press enter again to open it in Vim. Move down to the theme line and replace enter insert mode by pressing i. Then replace robbyrussel with agnoster. Press escape to exit insert mode, and then type :x to save and quit. Close your terminal, and open a new one. You'll see the following:

Clearly that doesn't look great. We need to install Powerline fonts in order to get all the attractive symbols we're looking for. These can be installed on Debian as follows:
sudo apt install fonts-powerlineNow close your terminal and reopen it again, and you'll see something much nicer:

Now by default, the git OMZ plugin is enabled. If you've got a git repo handy, try navigating into it. If not, you can use OMZ's:
cd .oh-my-zsh
Awesome! We can see what branch we're on, and by virtue of the green color, we know we're up to date with our remote! Let's change something in the folder:
echo "test" > a-new-file.txt
Okay, you get the idea :) Let's delete that file and move on:
rm a-new-file.txt
Making Terminator Borderless:
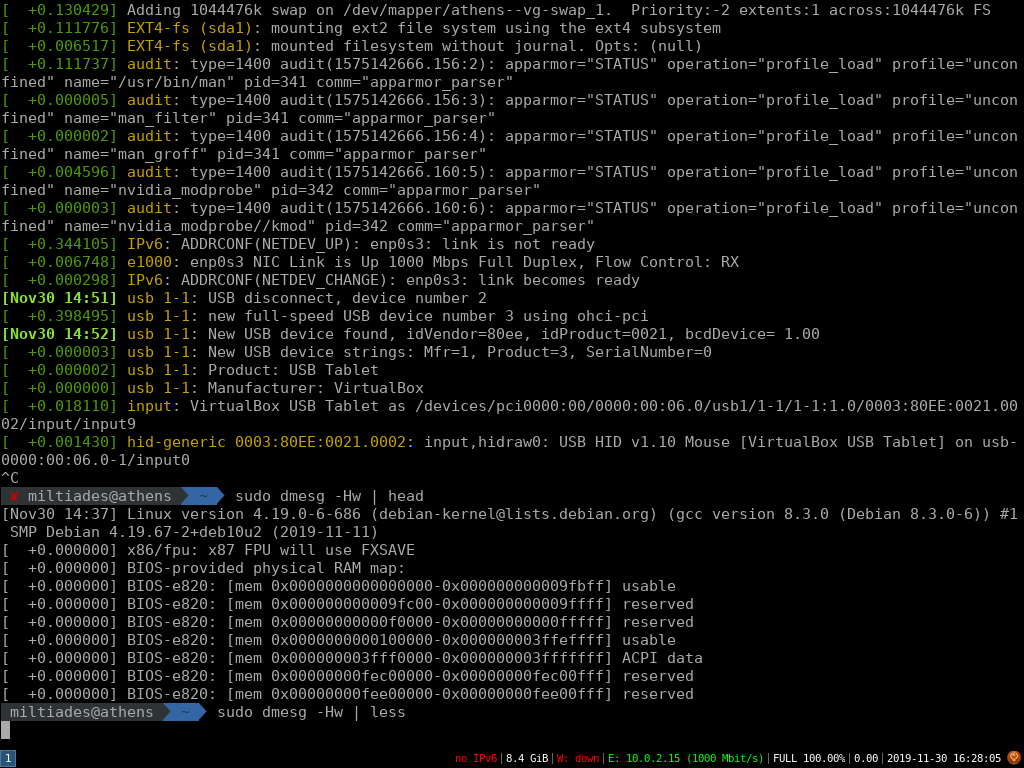
So our prompt is looking pretty good, but we don't need all that Terminator window decorating - especially with our enhanced prompt. Let's remove the bars at the top. In Terminator's preferences (right click anywhere inside a Terminator window and click 'Preferences'), uncheck 'Window Borders' in the Global tab. Then, under Profiles > General, uncheck 'Show titlebar'. While we're at it, let's also remove the scroll bar at the right. This won't disable scrolling, just the unnecessary bar. Under Profiles, choose Scrolling, and set "Scrollbar is:" to Disabled. Close the preferences window, close and reopen your terminal. Now if we're to run some commands, we'll have a nice, unadulterated full screen output - no wasted space! For show, I've run a couple commands:
Powerlevel9k:
Ok. Now what we've got right now is highly usable and it already looks great. But we could always use a little more power....
Let's install the Powerlevel9k theme and customize our prompt a bit! Run the following to clone Powerlevel9k into the OMZ directory:
git clone https://github.com/bhilburn/powerlevel9k.git ~/.oh-my-zsh/custom/themes/powerlevel9kNext, we'll edit our .zshrc file. Set the ZSH_THEME setting to "powerlevel9k/powerlevel9k", the same way we set it to agnoster before. Save your changes and reopen your terminal. Looking pretty good (and pretty similar to agnoster), but there seem to be some graphical issues - those black lines between the segments on the right don't look great:
![]()
We need to get some patched fonts! To install, we'll do the following:
First, make sure we have unzip installed:
sudo apt install unzipNext, we need to get ahold of some good looking fonts which already contain all the cool trimmings we might want to use (if you're not familiar with Font Awesome, check it out).
curl -L https://github.com/gabrielelana/awesome-terminal-fonts/archive/patching-strategy.zip > awesome-terminal-fonts.zip
unzip awesome-terminal-fonts.zip
Create the following font folder if it doesn't already exist:
mkdir ~/.local/share/fontsNow copy all of our newly acquired patched font files (the ttf files) into that directory:
cp -rv awesome-terminal-fonts-patching-strategy/patched/*.ttf ~/.local/share/fonts/Now we'll update our font cache so we can use our new fonts:
fc-cacheOk! Now close and reopen you terminal. All that's left to finish setting up Powerlevel9k is to set Terminator to use one of our newly installed fonts. I personally like Source Code Pro, so I set Terminator to use "SourceCodePro+Powerline+Awesome Regular". You can set the font by opening Terminator's preferences (by right clicking in an open window), navigating to the Profile, unchecking "Use the system fixed width font" and the finding your patched font of choice in the list. Close the preferences window and voila!

A couple more tricks to make our overall experience more uniform. Sometimes, we're gonna want to spawn a root shell to do things. If we were to do that now, we'd get bash, and even if we then ran zsh we'd wouldn't have our nice terminal. Let's fix that.
First, we'll set root to use zsh as it's default shell. We'll do this carefully. Run the following:
sudo vi /etc/passwdEdit the first line, with the root user settings to end in /bin/zsh instead of /bin/bash. Having saved those changes, we now need to provide a version of our zshrc file in the root user's home directory at /root. We'll want to be able to make changes to our config and have them populated to the root version too however, so we can effectively link the two by putting 'source /home/<user_main_user>/.zshrc' in /root/.zshrc:
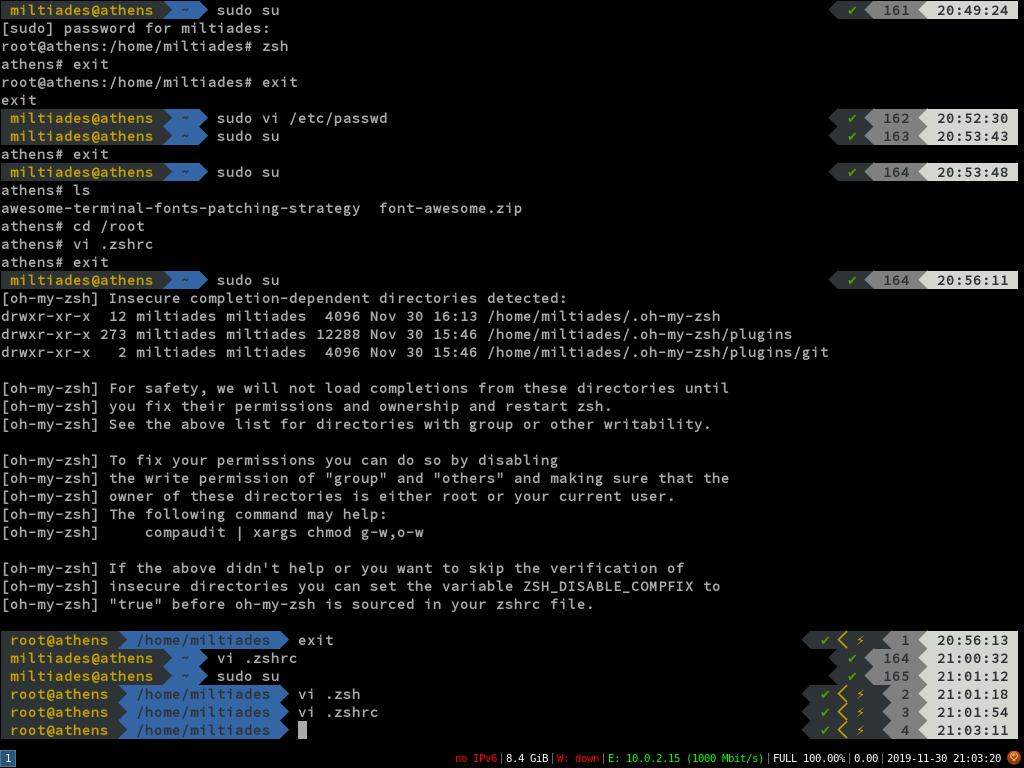
echo 'source /home/<your_main_user>/.zshrc' | sudo tee /root/.zshrcWhen we login to root, OMZ incorrectly thinks that the OMZ directory permissions are set wrong. We can suppress this warning by adding the following to our .zshrc file somewhere BEFORE the "source $ZSH/oh-my-zsh.sh" line:
ZSH_DISABLE_COMPFIX=true
Now if we login to root with sudo su, we'll see our customized zsh prompt, albeit with an indicator to the right suggesting we've got super user powers:
With all the setup out of the way, we're now free to customize our prompt!
Customizing the Prompt:
Briefly, we can create nearly any kind of prompt we'd like by setting POWERLEVEL9K_* directives in our .zshrc file. The following is the multiline prompt that I use on my daily driver. It's simple, straightforward and blue. Much, much more complicated (read 'cooler') configs can be found here. Remember however, that the more things you include in your prompt, the slower it may become. If you're counting cycles, this could be very important. The terminal main focus should be on the work your doing: the inputs and outputs.
POWERLEVEL9K_MODE='awesome-patched'
POWERLEVEL9K_SHORTEN_DIR_LENGTH=2
POWERLEVEL9K_PROMPT_ON_NEWLINE=true
# General:
POWERLEVEL9K_OS_ICON_BACKGROUND="white"
POWERLEVEL9K_OS_ICON_FOREGROUND="blue"
POWERLEVEL9K_DIR_HOME_FOREGROUND="white"
POWERLEVEL9K_DIR_HOME_SUBFOLDER_FOREGROUND="white"
POWERLEVEL9K_DIR_DEFAULT_FOREGROUND="white"
POWERLEVEL9K_ROOT_INDICATOR_BACKGROUND="red"
POWERLEVEL9K_ROOT_INDICATOR_FOREGROUND="white"
# Prompt Components:
POWERLEVEL9K_LEFT_PROMPT_ELEMENTS=(os_icon root_indicator dir vcs)
POWERLEVEL9K_RIGHT_PROMPT_ELEMENTS=(status)
POWERLEVEL9K_MULTILINE_FIRST_PROMPT_PREFIX="\e[1D"
POWERLEVEL9K_MULTILINE_SECOND_PROMPT_PREFIX="%F{white}%f "
Should you use the above, you'll get the following:
Final Touches:
The above screencap utilizes a program called screenfetch which cutely displays information about your machine. Including a screenfetch (or similar - there are a couple of similar alternatives) in any *nix screencap of this type is pretty much expected. You can install it in the usual manner:
sudo apt install screenfetchLastly, I've become pretty wed to a few command line alias. Aliases allow you to map complex behavior to shortcuts. The general form of an alias is as follows:
alias 'cmd=your command here'zsh comes with a fair number of these by default, and many more are added by OMZ's git plugin. You can get a listing by running alias with no arguments. Here are a few which I use:
alias o='xdg-open'    # mimics the open command in OS X
alias lsa='ls -lahF'  # long form listing with trailing slashes
alias lsd='ls -lhtr'  # long form listing sorted by date, oldest to newest
alias cx='chmod +x'   # shortcut for making a file executable
You may add these, or whatever aliases you find useful to he end of your .zshrc file to make them always available.
Now enjoy Oh My Zsh, Powerlevel9k and customizing your prompt!